WGU D303 OA Study Guide I - 2025 | Azure: Building Strong Networks and Keeping Data Safe📖
Imagine running a theme park. You need pathways (networks) for visitors to move freely, checkpoints (security groups) to ensure safety, and backup plans (redundancy) in case something goes wrong. Azure, Microsoft’s cloud platform, works in much the same way to manage and protect data and networks.
In this article, we’ll explore three essential topics to help you understand Azure better and tackle WGU D303 OA questions confidently:
- Azure Virtual Networks (VNets) and Peering: These are the pathways connecting resources in Azure, ensuring they can communicate seamlessly while staying secure and private. It’s like building a smart highway system for your data.
- Network Security Groups (NSGs) vs. Application Security Groups (ASGs): Think of these as checkpoints and restricted areas in your park. NSGs control traffic flow, while ASGs group resources logically for easier management.
- Data Redundancy Options (LRS, ZRS, GRS, RA-GRS): This is a contingency plan under whose arrangement, you have many copies of your data so that in the event that things go wrong, you can easily retrieve it.
The topics will be divided into smaller subtopics for easier understanding accompanied by layman’s language and examples to help shed some light on topics. By the end of this tutorial, you will understand how these ideas make your data move, stay safe, and be accessed at any time despite different issues. Okay then, let’s get going! So have that cup of coffee ready!
How to Use This Guide for the WGU D303 OA Exam?📖
The D303 Azure Fundamentals OA exam at WGU evaluates your understanding of Azure networking concepts, security configurations, and data redundancy options. This guide simplifies the key concepts of Azure Virtual Networks (VNets) and Peering, Network Security Groups (NSGs) vs. Application Security Groups (ASGs), and data redundancy options (LRS, ZRS, GRS, RA-GRS) to help you grasp the topics tested in the exam.
We also provide exam-style questions and practical applications to ensure you’re fully prepared for the questions on the WGU D303 OA exam.

Understanding Azure Virtual Networks (VNets) and Peering For D303 OA📝
If you have ever considered networking computers in your home or school, then there is probably a clear vision of creating a Wi-Fi network that will enable your devices to communicate and interface with each other as well as the wide world of the internet. In the realm of cloud computing Azure Virtual Networks or VNets are similar to the Wi-Fi mentioned above but on a much grander scale and with more options. This is assuming we break down this step by step.
What is a Virtual Network (VNet)?
Just ingratiate yourself into the thinking of being able to peek through the fence and see that only certain individuals are allowed to come and play in the playground. Likewise, VNet is equivalent to an organization’s virtual network located in the Azure cloud where VMs and applications can safely communicate. That makes it possible for your resources to be secure from hostile forces, thus providing the best outlet for communication and exchange of information like a secured playground behind a fence, wherein only authorized persons are allowed to access.
Here are the key features of a VNet:
- Logical Isolation: Just like separate classrooms in a school, VNets create spaces where resources are isolated from one another unless you allow them to communicate.
- Address Spaces: Think of this as assigning a range of house numbers to a street. VNets use address spaces written in CIDR notation (like 10.0.0.0/16) to organize their network.
- Subnets: Subnets divide a VNet into smaller sections. It’s like splitting a big playground into areas for soccer, basketball, and swings. Each subnet can have unique rules and responsibilities.
Components of a VNet
VNets are made up of several parts that work together to ensure smooth communication and security:
- Subnets:
- Public Subnets: These are like open gates, allowing resources to connect directly to the internet.
- Private Subnets: These are more like closed gates, keeping resources inside unless they’re given permission to go out.
- Network Security Groups (NSGs):
- These act as security guards, controlling what traffic can enter or leave your subnets.
- Rules can be created to block or allow specific types of communication.
- Routing:
- Azure automatically decides how data travels within a VNet. You can also set custom routes if you need more control.
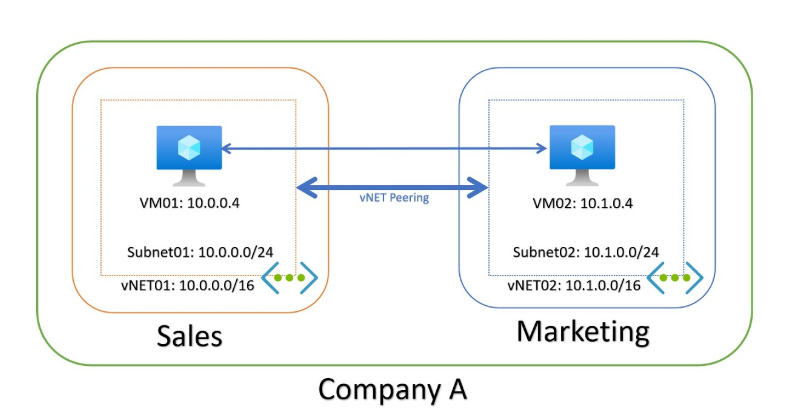
What is VNet Peering?
Now, let’s say you have two playgrounds, and you want kids from both to play together without opening the main gates. In the context of Azure, VNet Peering acts like building a secure, private bridge between these playgrounds. This bridge allows resources in one VNet to communicate seamlessly with resources in the other VNet as if they were part of the same environment, while still keeping everything private and isolated from the public internet. The peering connection ensures that the data flows securely and efficiently between the two VNets, offering a unified network experience.
There are two types of peering:
- Intra-region Peering: Connecting VNets in the same Azure region.
- Inter-region Peering: Connecting VNets across different Azure regions.
Benefits of VNet Peering
- Enhanced Security: Resources can communicate using private IP addresses, so there’s no need to expose them to the public internet.
- Reduced Latency: Communication is faster because it happens directly between VNets.
- Simplified Architecture: Sharing resources across VNets becomes easy, without needing a VPN or public internet.
Real-world Uses of VNets
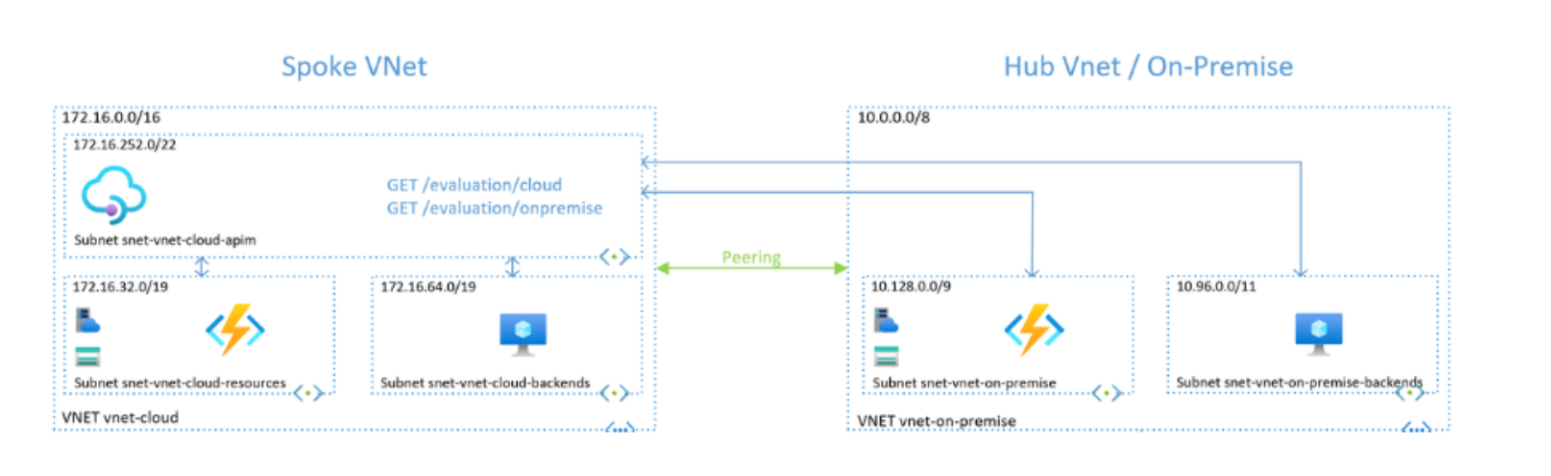
- Private Cloud Solutions: Securely connect VMs and services within Azure.
- Hybrid Cloud Architectures: Extend your local network to Azure using VNets.
- Multi-tier Applications: Deploy apps with separate tiers (e.g., web, app, database) in different subnets for better organization and security.
How to Configure VNets and Peering
Let’s walk through the steps to create a VNet and set up peering:
- Create a Virtual Network:
- Log into Azure and search for “Virtual networks.”
- Click “+ Create” and fill in details like subscription, resource group, name, and region.
- Define the address space (e.g., 10.0.0.0/16) and create subnets (e.g., 10.0.0.0/24).
- Set Up Subnets:
- Go to the VNet’s page and add additional subnets as needed. Each subnet gets its own name and address range.
- Go to the VNet’s page and add additional subnets as needed. Each subnet gets its own name and address range.
- Configure Network Security Groups (NSGs):
- Create an NSG to control traffic in and out of the subnet. Define rules to specify allowed or blocked traffic.
- Create an NSG to control traffic in and out of the subnet. Define rules to specify allowed or blocked traffic.
- Peer Two VNets:
- Create a second VNet.
- Navigate to one of the VNets and select “Peerings.” Click “+ Add” and provide a name for the connection.
- Choose the second VNet from the dropdown and configure settings like traffic forwarding.
- Repeat the process on the second VNet to complete the connection.
- Verify Peering:
- Check the status of the peering connection in both VNets. It should indicate that the connection is established.
Best Practices
- Plan address spaces carefully to avoid overlapping.
- Use NSGs to enhance security within subnets.
- Regularly monitor peering connections for performance and compliance.
Importance For D303 OA
By mastering Azure VNets and Peering, you unlock the potential to create secure, efficient, and scalable networks. This knowledge is essential for excelling in WGU D303 and answering WGU D303 OA questions confidently.

Network Security Groups (NSGs) vs. Application Security Groups (ASGs) For D303 OA📝
Imagine you are organizing a big event at a stadium. You need security guards at the gates to decide who can come in and who must stay out. At the same time, you want different sections within the stadium—VIP areas, regular seating, and backstage—to have their own access rules. In Azure, Network Security Groups (NSGs) and Application Security Groups (ASGs) help manage security in a similar way. Let’s dive deeper to understand how these tools work and how they differ.
What are Network Security Groups (NSGs)?
Think of NSGs as the security guards standing at the gates, ensuring only authorized individuals can enter. They control traffic entering and leaving your Azure resources, such as virtual machines (VMs) or subnets, by applying specific rules. These rules include factors like source and destination IP addresses, ports, and protocols. This way, NSGs help keep unwanted traffic out while allowing the right connections to flow in or out.
Key Features of NSGs:
- Traffic Filtering: NSGs filter inbound and outbound traffic based on rules you create. For example, you can allow web traffic (HTTP/HTTPS) while blocking all other types.
- Stateful Inspection: NSGs remember the state of a connection, so if traffic is allowed in one direction, the response is automatically permitted.
- Layer 3 and Layer 4: They operate at the network and transport layers of the OSI model, filtering traffic based on IP addresses, ports, and protocols.
What are Application Security Groups (ASGs)?
While NSGs control the gates, ASGs manage the different sections within the stadium by organizing resources into logical groupings. For example, if you have multiple virtual machines (VMs) serving different roles, like hosting a website, running the application logic, or managing the database, ASGs allow you to group these VMs based on their functions. This way, you can apply specific rules tailored to each group, ensuring seamless communication between the tiers while maintaining robust security. ASGs also reduce complexity by eliminating the need to manage rules for individual IP addresses, making them ideal for dynamic and scalable environments.
Key Features of ASGs:
- Logical Grouping: Instead of applying rules to individual IP addresses, you can assign VMs to an ASG and create rules for the group.
- Simplified Management: ASGs reduce complexity by organizing resources logically, which is especially useful for large-scale applications.
- Dynamic Membership: Adding or removing VMs from an ASG automatically updates the rules applied to them.
Differences Between NSGs and ASGs
Feature | Network Security Groups (NSGs) | Application Security Groups (ASGs) |
Purpose | Controls network-level security | Manages application-level security |
Layer of Operation | Layer 3 & Layer 4 | Layer 4 |
Scope of Rules | Subnets or NICs | Logical groups of VMs |
Rule Management | IP-based | Group-based |
Use Cases | Broad network security | Fine-grained application security |
How They Work Together
NSGs and ASGs aren’t competitors; they’re teammates. NSGs enforce security at the network level, while ASGs simplify management at the application level. For example, you can use NSGs to secure your entire subnet while using ASGs to control traffic between application tiers like the web and database layers.
When to Use NSGs
- To enforce security across entire subnets or networks.
- For scenarios requiring strict access control lists (ACLs) based on IP addresses.
- To block or allow external traffic to Azure resources.
When to Use ASGs
- For multi-tier applications where different layers need specific rules.
- To dynamically manage security policies as VMs are added or removed.
- To simplify rule management in complex environments.
How to Configure NSGs and ASGs
Configuring NSGs:
- Create an NSG:
- In the Azure portal, search for “Network security groups” and click “+ Create.”
- Enter the required details like subscription, resource group, name, and region.
- Add Security Rules:
- Define inbound and outbound rules for traffic, specifying sources, destinations, ports, and protocols.
- Define inbound and outbound rules for traffic, specifying sources, destinations, ports, and protocols.
- Associate with a Subnet or NIC:
- Apply the NSG to a subnet or specific network interface.
- Apply the NSG to a subnet or specific network interface.
Configuring ASGs:
- Create an ASG:
- Search for “Application security groups” in the Azure portal and click “+ Create.”
- Provide details like the ASG name, region, and resource group.
- Confirm the configuration by clicking “Create.”
- Assign VMs to ASGs:
- Go to the ASG you created and add the network interfaces of the VMs you want to group.
- Save the changes, and the VMs will now be logically grouped.
- Use ASGs in NSG Rules:
- While setting up or editing NSG rules, select ASGs as the source or destination instead of individual IP addresses.
- Specify other parameters like port numbers and protocols to refine the traffic control.
Best Practices
- Combine NSGs and ASGs to create a layered security approach.
- Regularly review and update security rules to align with application requirements.
- Use ASGs to simplify rule management in environments with frequent changes.
Importance For D303 OA
By understanding and leveraging both NSGs and ASGs, you can create a secure, flexible, and scalable network architecture in Azure. Mastering these concepts will not only help you in real-world scenarios but also prepare you to answer WGU D303 OA questions with confidence.
Tired of reading blog articles?
Let’s Watch Our Free WGU D303 Practice Questions Video Below!
Data Redundancy Options in Azure: LRS, ZRS, GRS, and RA-GRS For D303 OA📝
When it comes to keeping your data safe and always available, Azure provides several redundancy options. These options ensure your data remains secure, even if something goes wrong, like hardware failure or data center outages. Let’s explore these options—Locally Redundant Storage (LRS), Zone-Redundant Storage (ZRS), Geo-Redundant Storage (GRS), and Read-Access Geo-Redundant Storage (RA-GRS)—step by step.
What is Data Redundancy?
Data redundancy is like having multiple copies of your homework saved in different places—your computer, a USB drive, and the cloud. Even if one copy is lost or damaged, you still have backups to rely on. In Azure, redundancy ensures your data is replicated to protect against failures and to ensure availability.
Locally Redundant Storage (LRS)
LRS is the simplest form of redundancy. It keeps three copies of your data in a single data center within a specific Azure region.
- How it Works:
- When you save data, Azure automatically creates three copies within one physical location.
- This protects your data from hardware failures in that data center.
- Best For:
- Applications that don’t require high availability across regions.
- Cost-conscious solutions where data residency within a single location is sufficient.
- Limitations:
- If the entire data center goes offline, you won’t have access to your data.
Zone-Redundant Storage (ZRS)
ZRS offers more protection by replicating data across multiple data centers (availability zones) within the same Azure region.
- How it Works:
- Your data is copied across three zones within a region, ensuring continued availability even if one zone fails.
- Your data is copied across three zones within a region, ensuring continued availability even if one zone fails.
- Best For:
- Applications requiring high availability and protection against data center outages within a region.
- Scenarios where regional compliance is essential.
- Benefits:
- Increased reliability compared to LRS.
- Low latency access to your data within the same region.
Geo-Redundant Storage (GRS)
GRS takes redundancy a step further by replicating your data across two geographically separate regions. This ensures that even if an entire region becomes unavailable, your data remains safe.
- How it Works:
- Your data is copied three times within the primary region (using LRS) and then asynchronously replicated to a secondary region.
- Your data is copied three times within the primary region (using LRS) and then asynchronously replicated to a secondary region.
- Best For:
- Businesses needing disaster recovery solutions.
- Applications where regional outages could severely impact operations.
- Trade-Offs:
- Higher latency for accessing data in the secondary region.
- More expensive than LRS or ZRS.
Read-Access Geo-Redundant Storage (RA-GRS)
RA-GRS builds on GRS by allowing read access to the secondary region. This means your data is not only safe but can also be accessed even during outages in the primary region.
- How it Works:
- Like GRS, data is replicated across two regions. However, RA-GRS enables you to read data from the secondary region.
- Like GRS, data is replicated across two regions. However, RA-GRS enables you to read data from the secondary region.
- Best For:
- Applications requiring high availability and the ability to provide read-only access during outages.
- Critical systems where downtime is not acceptable.
- Advantages:
- Ensures business continuity by enabling read access during primary region outages.
- Ideal for global applications serving users in multiple regions.
Choosing the Right Option
Redundancy Option | Copies | Scope | Use Case |
LRS | 3 | Single Data Center | Basic redundancy, cost-effective |
ZRS | 3 | Multiple Zones (1 Region) | High availability within a region |
GRS | 6 (3+3) | Two Regions | Disaster recovery |
RA-GRS | 6 (3+3) | Two Regions | High availability with read access |
Practical Scenarios
- LRS: Suitable for archival data or applications with minimal redundancy requirements.
- ZRS: Ideal for scenarios requiring fault tolerance within a region, such as e-commerce websites.
- GRS: Perfect for backup and recovery solutions.
- RA-GRS: Best for global applications with critical uptime needs.
Best Practices
- Assess your business’s redundancy requirements before choosing an option.
- Regularly test your disaster recovery setup, especially with GRS or RA-GRS.
- Monitor costs to ensure the chosen option aligns with your budget.
Importance For D303 OA
By understanding Azure’s redundancy options, you can ensure your data is always protected and accessible. Mastering these concepts is essential for tackling WGU D303 OA questions and applying them effectively in real-world scenarios.
Wrapping It Up: Mastering Azure Concepts with WGU D303📄
Well done for getting to the end of the article. By now, you must have wonderfully discovered Azure Virtual Networks or VNets and Peering, Network Security Groups NSGs or Application Security Groups ASGs & Data Redundancy Options LRS, ZRS, GRS, RA-GRS. All of these topics are not only necessary for a proper grasp of Azure but also necessary for the successful completion of the WGU D303 OA.
As you progress with these ideas, ensure that you are cognizant of the fact that the real strengths of Azure are in how these pieces can be woven together to produce an integrated, well-protected environment for your applications as well as your data. Ironing out these concepts will not only help you on the last piece of the assessment but will also provide you with a strong base for real cloud solutions.
Take your time to revisit the key points, practice setting up VNets, NSGs, and ASGs, and understand how redundancy keeps your data safe. You’ve got this! With a bit of effort and determination, you’re on the path to success.
Good luck with your WGU D303 OA—you’re ready to shine!